Sorry to those of you who have been waiting for this tutorial, but here it is! I will be giving away this Thomas the Train fun, washable and entertaining Toddler To-Go Placemat (minus kitchenware) and for the rest of you I will show you how to make your own! (giveaway now closed) If you don't want to make this but still want one, you can go to the My Etsy tab above and buy one from my shop.
Materials Needed:Your favorite fun fabric for the main placemat portion - 2 pieces cut 20x13
Coordination fabric for pockets- 4 pieces cut 2x3 1/2 , 2 pieces 9 1/2 x 7
Knit fabric for tie (1x20) or if you want to use cotton for your tie appox 3x27 (because it will not stretch and you will need to hem)
I used this plate from walmart because it's$1.17 and I figured everyone could find it. They have it in this 3 portioned one and a square one, either one will fit the dimensions I used.
 First we'll get the pockets done. I learned how to do pockets this way, and I think it's by far the easiest. Grab your 2 matching pieces, right sides together, sew around 3 sides leaving one side open (1/4 seam allowance) zig zag your s.a so it will not fray. (like you would do with a pillow) **Important- make sure the side you leave open will be the bottom or side of your pocket, so it can be sewn shut by the topstiching*** Then clip your corners. This helps the corners lay flatter when you flip it right side out. Now flip your pocket right side out. I then zig zag closed the last side un-sewn side (is that a word?) and fold under 1/4in. and iron down.
Do this to your plate pocket and your 2 side pockets.
Now, place your pockets onto the placemat where you would like them, and pin down (make sure your un-sewn side is at the sides or bottom, not on top)

Sew 1/8 in. to a 1/4 top stitch around the 2 sides and bottom of your pocket. (Make sure you backstich and the beginning and end really well) Do not sew closed the top! This is your pocket now! Then in the middle of your utensils pocket sew a line down the center.
Pockets done!
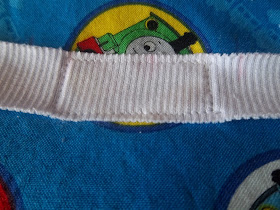
Next, grab your placemat bottom piece (the one you didn't just sew the pockets onto) We are going to sew your tie on now. Match up your bottom placemat piece to your top piece and mark about 3/4 the way up from the bottom of your plate pocket and halfway in between that pocket. Now put aside the top placemat piece we are only working with the bottom- you were just using it for measurement. I find the half way point from my piece of knit (I use this cause no need to hem and it will not fray and it stretches to keep your things in there tightly) pin it in place and about an inch on each side.
Now you are going to sew that piece on in a square, do not stretch while you sew. I sewed a lot of backstitches also to make sure it stayed on very tightly.
Almost done! Now for the easy part! Grab your 2 placemat pieces and put them right sides together. Make sure your tie is not anywhere where it will get accidentally sewn! Pin all around your placemat except leave about a 3 inch opening to flip back right side out.
Now using a 3/8 seam allowance stitch all the way around..except your opening, make sure to backstitch and front and end. Now flip inside out..hopefully you didn't sew your strap in anywhere ;) Next your will tuck in the extra fabric and iron that little openingTopstitch 1/4 ALL the way around your whole placemat (backstitch) and YOU'RE DONE!
Now you can put your utensils in a pocket. You can put a train in a pocket.

or a napkin I guess....
To fold it up, fold over the top part,
then fold in each side,
and Tie!
Hope you liked my tutorial! If you have any questions please ask! I always wonder if I explain every part clearly!


What an awesome tutorial! I love the idea of having everything in one easy location for totting along with you AND for storage! Great job!!
ReplyDeletestephklatte (at) yahoo (dot) com
So neat! Wish I could sew my boys would love this :)
ReplyDeleteDarcy
DarcyMama0506@aol.com
Liked on FB as well :) Can't wait to look around to see what you have to offer
ReplyDeleteDarcy
DarcyMama0506@aol.com
Darcy,
ReplyDeleteShe has an Etsy account for those of us who can't sew.
Wendy
Great tutorial! We rarely eat out with the kids (for my sanity's sake)so I was going to pass on making these, but then I thought these would be great to take along to family reunions and picnics (cuz those picnic table are usually nasty). Thanks for sharing the tutorial!
ReplyDelete