
Thursday, March 31, 2011
Giveaway Winner!
Darcy you are the winner! Lucky you! I will email you for the address to mail your prize! I had a lot of site views of my tutorial, but I guess people are skeptical about entering contests. OH WELL! It was fun and I hope you enjoy it! If anyone would like to buy a Toddler To-Go Placemat. They are available in my Etsy Shop. If you would like a different character other than Thomas the Train all you have to do is message me through etsy or here on my blog and I can do a custom listing for you. Have a nice day!
Tuesday, March 29, 2011
Toddler To-Go Placemat Tutorial
Sorry to those of you who have been waiting for this tutorial, but here it is! I will be giving away this Thomas the Train fun, washable and entertaining Toddler To-Go Placemat (minus kitchenware) and for the rest of you I will show you how to make your own! (giveaway now closed) If you don't want to make this but still want one, you can go to the My Etsy tab above and buy one from my shop.


Your favorite fun fabric for the main placemat portion - 2 pieces cut 20x13
Coordination fabric for pockets- 4 pieces cut 2x3 1/2 , 2 pieces 9 1/2 x 7
Knit fabric for tie (1x20) or if you want to use cotton for your tie appox 3x27 (because it will not stretch and you will need to hem)
I used this plate from walmart because it's$1.17 and I figured everyone could find it. They have it in this 3 portioned one and a square one, either one will fit the dimensions I used.


 First we'll get the pockets done. I learned how to do pockets this way, and I think it's by far the easiest. Grab your 2 matching pieces, right sides together, sew around 3 sides leaving one side open (1/4 seam allowance) zig zag your s.a so it will not fray. (like you would do with a pillow) **Important- make sure the side you leave open will be the bottom or side of your pocket, so it can be sewn shut by the topstiching*** Then clip your corners. This helps the corners lay flatter when you flip it right side out. Now flip your pocket right side out. I then zig zag closed the last side un-sewn side (is that a word?) and fold under 1/4in. and iron down.
Do this to your plate pocket and your 2 side pockets.
Now, place your pockets onto the placemat where you would like them, and pin down (make sure your un-sewn side is at the sides or bottom, not on top)

Sew 1/8 in. to a 1/4 top stitch around the 2 sides and bottom of your pocket. (Make sure you backstich and the beginning and end really well) Do not sew closed the top! This is your pocket now! Then in the middle of your utensils pocket sew a line down the center.

Pockets done!
Next, grab your placemat bottom piece (the one you didn't just sew the pockets onto) We are going to sew your tie on now. Match up your bottom placemat piece to your top piece and mark about 3/4 the way up from the bottom of your plate pocket and halfway in between that pocket. Now put aside the top placemat piece we are only working with the bottom- you were just using it for measurement. I find the half way point from my piece of knit (I use this cause no need to hem and it will not fray and it stretches to keep your things in there tightly) pin it in place and about an inch on each side.

Now you are going to sew that piece on in a square, do not stretch while you sew. I sewed a lot of backstitches also to make sure it stayed on very tightly.

Almost done! Now for the easy part! Grab your 2 placemat pieces and put them right sides together. Make sure your tie is not anywhere where it will get accidentally sewn! Pin all around your placemat except leave about a 3 inch opening to flip back right side out.


or a napkin I guess....
To fold it up, fold over the top part,

then fold in each side,

and Tie!

Saturday, March 26, 2011
Weekend plans
 I really should stop posting dates of when I will put up my tutorials, cause those never seem to work! LOL
I will try and get the "placemat to-go" tutorial and giveaway done this weekend, since I know that's when most of you have your extra sewing time. For me, having 4 kids, it seems to be the opposite. Also, my littlest has not been feeling well the past couple of days, but is getting better. Which is good because tomorrow is our DAY OUT WITH THOMAS! As you may or may not know, my 2 year old is Thomas crazy. We will be doing a lot of Thomas things in the blogging months to come.
I would also like to fit in Made's Warhol Dress (not the stenciling but the actual style of the dress). I already got 2 great colors of t-shirts from CVS for 2.00 each. If I make any changes from her directions along the way (which I usually do) I will let ya'll know!
Lastly, Lilly goes home today! Things progressed greatly over the last 24 hours and she is going home from the hospital! YEA!
Friday, March 25, 2011
Lilly update day 3 and 4
Well yesterday was a rough day. Lilly couldn't keep anything down and had to get her IV put back in. They were also waiting on a bowel movement which was not happening. I just got an update that she is finally keeping food down and had a full diaper! (That's the only time a mom is happy to hear those words ;) Luckily she had a lot of kimonos to wear because she went through quite a few yesterday, in addition to poor mom needing a few clothes changes! She is in a regular room now so at least the family has some privacy now. Poor parents and grandma are definitely a little sleep deprived so any friends in the area that want to stop by with a good cup of coffee, I am sure they would love it! Keep the prayers coming, HE is always listening!

Thursday, March 24, 2011
Coming soon.. Traveling Placemat Tutorial and Giveaway!
This is one of my most prized possessions when we go out to eat.


A lot of times places have breakable plates which I am scared to death he will pick up and drop and although he can use a real fork, this smaller metal kids version is much easier for him. Plus, kids just get food EVERYWHERE, it never seems to STAY on the plate. So I made him this traveling placemat (everything has to be Thomas). I love this one because he takes his trains everywhere and this one has a little track for him to run his trains on while he is eating.
 |
| This pic was not posed..he really had that train right there! LOL |
 |
| mmm Chipotle... |
So.. I will be making another traveling placemat with a tutorial to go along with it, and then I will give away the placemat I made!! (Utensils not included) I will probably make another Thomas one, possibly different fabrics though..cause Thomas is just so cool and girls love him just as much as boys! I will try and get it made today, but I have sewing class tonight (yes I still go and learn new things!) and then I am visiting Lilly in the hospital. So look for my post either tonight or tomorrow!
Wednesday, March 23, 2011
A Happy Update on Lilly and pics!
Well yesterday was a rough day for poor Lilly, after they took the breathing tube out she was crying and in a lot of pain. They weren't sure if it was anxiety and her trying to wake up or just pain. Finally after 5 round of pain meds at about 11pm (her breathing tube came out at 3:30pm) she settled down.
This morning she opened her eyes and started to come to. They started to wake up all her organs and most of her tubing has been removed. She is now on pain meds which keep her sleepy but she wakes up to eat (which is just bottles right now). Her mommy finally got to hold her for the first time this afternoon for a little bit. Now that enough of her tubing has been removed she can finally wear a kimono!


Tuesday, March 22, 2011
Lilly's surgery is done!
Keep reading below for continual updates:
3/22 1:00pm Lilly is out of surgery and in ICU. Per Lilly's Aunt, the surgeon said everything went well. She will be sedated for at least a day to keep her still. I will let you know anymore updates I hear! Thank you for all the prayers!
Update from Lilly's Aunt at 3:20pm... They are getting ready to take her off the vent soon, hopefully they can console her easily and she will not be in much pain.
Update on Lilly from her mom via fb at 7:30pm-
Please pray for Lilly. After at least 5 rounds of pain meds, she is still in a lot of pain. She's been screaming and crying since they removed the breathing tube around 3:30.
3/23/11 8:00am Lilly's mom said she is sleeping peacefully, still in a little pain but that's to be expected. Here's hoping for a good day!
3/22 1:00pm Lilly is out of surgery and in ICU. Per Lilly's Aunt, the surgeon said everything went well. She will be sedated for at least a day to keep her still. I will let you know anymore updates I hear! Thank you for all the prayers!
 |
| Hard to see her like this..but knowing she will soon be okay helps!! Now you see why the kimonos were so important! I don't think she can wear anything til she is out of ICU. |
Update on Lilly from her mom via fb at 7:30pm-
Please pray for Lilly. After at least 5 rounds of pain meds, she is still in a lot of pain. She's been screaming and crying since they removed the breathing tube around 3:30.
3/23/11 8:00am Lilly's mom said she is sleeping peacefully, still in a little pain but that's to be expected. Here's hoping for a good day!
Monday, March 21, 2011
Pray for Lilly tomorrow!
Sewing for Lilly was a huge success! Lilly received over 20 kimonos from all over the United States and one from Austria!! Her surgery is scheduled for tomorrow and we will all be praying our hardest for her.

There have been a couple of fundraisers around town for her medical bills and I participated in the walk/run last Saturday too! The local news came by and did a small story on the walk.
Here is the link to watch a little clip and hear from Lilly's mom.
I can't say thank you enough again to all the wonderful blog ladies that participated and helped Lilly.
Nicole at 60 piggiesAngel at TaDa Creations
Nancy at Nancy's Couture
 I started a scrapbook for Lilly with pictures of everyone's kimonos that were sent and the sweet notes that went along with them. (Not really my fortay btw- I'll stick to sewing ;) Thank you for everyone's hard work that went into them!
 To see Lilly's kimonos go to her Flickr pool- Sewing for Lilly.
Be thinking about Lilly tomorrow (3/22) and keep her in your prayers.
Also if you would like to keep it going, please send Josie Mae a kimono. She has surgery next week. My kimonos are headed out the door now!
To keep updated on Lilly's surgery as it happens, her mom will be updating her blog throughout the day. Pray for Lilly
To keep updated on Lilly's surgery as it happens, her mom will be updating her blog throughout the day. Pray for Lilly
It's here! T-shirt resizing tutorial!
Okay here it is finally! Sorry it took so long! Alright materials... old t shirt and a t-shirt that fits your child.

Lay your t-shirt that fits over the t-shirt you want to resize. In this case I am keeping the collar and shoulder seams on my resized shirt because they are small enough. **I will have the option if your collar is too big, how to add a rib knit at the end** If your collar is fine, cut around the t-shirt arms and bottom leaving yourself a seam allowance! (If you look at your shirt you will notice they hem under about an inch and a half on the bottom so leave a bigger seam allowance on the bottom).


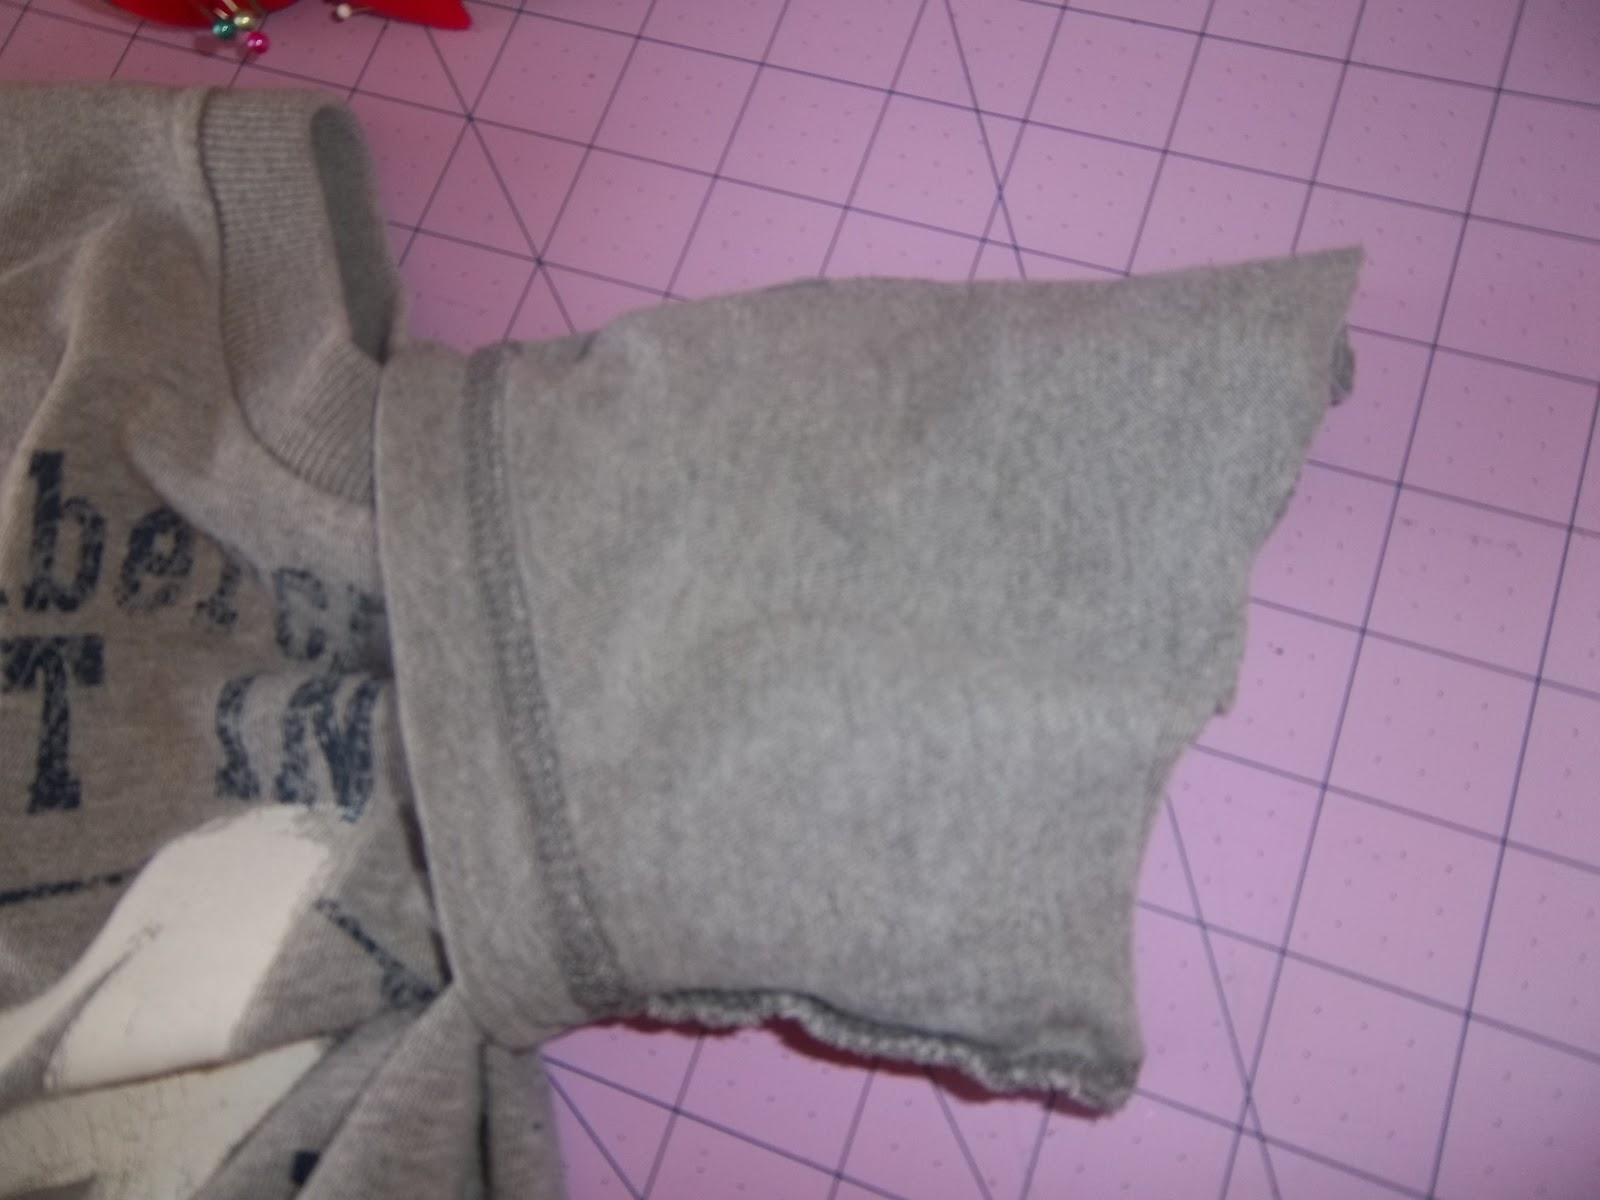
Next you will lay your sleeve over your shirt you are resizing and cut around that as well. At Nancy's Couture she cuts her sleeves off from the bottom...mine are cut from the top (aka top is open).

Now here is where I did things different from everyone else. I sewed both sides of my shirt. Then on my now smaller sleeves, I sewed closed the top so it is a tube again (just like you would do if you had a pattern) - **right sides together**


So now both my side seams are re-sewn and my sleeves are re-sewn other than where they attach to the shirt. Now I will attach my sleeves to the shirt. To do this, turn your tshirt and your sleeves right side out again - like you are looking at your shirt normally. Basically you will kind of need to insert your tshirt into your sleeve a little to get the right sides of your shoulders seams and bottom seams to match up to the corners of your shirt where you attach your sleeves (this is really a lot harder to explain than I thought-which is why I take a lot of pics :) Also I cut too little of my sleeve so I had a lot more sleeve width, so it didn't match up to my shirt well, so I just sewed another seam to make it smaller on top and then re-pinned.


If you collar was too big in the beginning you need to cut around your WHOLE shirt including the shoulders and collar (leaving seam allowance)(sorry for the pics of 2 different shirts in this part)

I got my rib knit at Joanns, it takes a very small amount for me an 1/8 yard could make a few shirts. Measure around the front and back of your collar of the shirt..mine was 14 inches, so I cut my rib knit at 12 inches length (because it stretches)and 2 and 1/4 width (for seam allowance and fold, I wanted a 1 inch collar). There is a formula for this, using 2/3rds..but I just guesstimated. Also you want to cut so the ribbing is horizontal when you use it which allows it to stretch the correct way once it is on your collar.

Before you start you need to sew one shoulder seam closed (rs together) so that you can sew on your collar as one continuous piece. (I didn't take a pic here so if you need one, let me know) Here you can see I folded over my ribbing. Now I am going to scoot that raw edge of my rib knit up to that raw edge of the tshirt and sew (right sides together) When you sew you are supposed to stretch the rib knit and sew. The FIRST time I did this I stretched WAY too much and it was like pleats on the front of my shirt and the collar was really small. Cue seam ripper. So basically its a very slight stretch.


When you finish you might have some overhang..that is fine because now you are going to sew that other shoulder seam closed and enclose your collar and ribbing (rs together)


Subscribe to:
Posts (Atom)